

- Pengantar
Pengertian Web Server
- Web Server adalah software (dan sekaligus komputer/server) yang berfungsi untuk melayani permintaan (request) dari client melalui protokol HTTP/HTTPS dan menampilkan halaman web di browser.
- Client biasanya adalah web browser (Chrome, Firefox, Edge, dll).
- Web Server menyimpan dan menyajikan:
- File HTML, CSS, JavaScript.
- Gambar, video, dokumen.
- Script dinamis (PHP, Python, dll) melalui integrasi dengan aplikasi lain.
🔎 Contoh nyata: Saat kamu membuka https://tjkt.smkn1klaten.sch.id, browser menghubungi Web Server sekolah untuk menampilkan halaman web.
Fungsi Web Server
- Melayani Permintaan HTTP/HTTPS
Browser mengirim permintaan, server merespons dengan halaman web. - Hosting Website
Menyimpan file dan konten web agar bisa diakses oleh pengguna. - Keamanan Akses
Bisa dipasangi SSL/TLS (https) agar komunikasi terenkripsi. - Mendukung Aplikasi Web
Misalnya e-learning, e-raport, atau aplikasi berbasis PHP/MySQL.
Jenis Web Server Populer
- Apache HTTP Server
- Paling banyak digunakan.
- Open Source, berjalan di Linux/Windows.
- Mendukung PHP, MySQL.
- Nginx (Engine X)
- Ringan, cepat, cocok untuk traffic tinggi.
- Banyak dipakai oleh website besar.
- LiteSpeed
- Performa tinggi, komersial (ada versi gratis OpenLiteSpeed).
- Microsoft IIS (Internet Information Services)
- Khusus Windows Server.
Komponen Penting Web Server
- Hardware Server → komputer/server dengan jaringan internet.
- Software Server → Apache/Nginx/IIS.
- Database Server → MySQL/MariaDB/PostgreSQL.
- Bahasa Pemrograman Web → PHP, Python, Node.js.
Alur Kerja Web Server
- User mengetik alamat di browser → tjkt.smkn1klaten.sch.id.
- DNS mengubah nama domain menjadi alamat IP.
- Browser mengirim request ke Web Server.
- Web Server mencari file yang diminta (misalnya index.html).
- Server mengirim balik file tersebut ke browser.
- Browser menampilkan halaman web kepada user.
- Instalasi & Konfigurasi Web Server
Kali ini, kita akan menggunakan jenis web server Apache HTTP Server yang paling banyak digunakan oleh user. Kita akan menggunakan protocol HTTP maupun HTTPS
Langkah 1 – Instalasi Apache
Login sebagai user root dan lakukan update terlebih dahulu.
root@ns100:~# apt update
Get:1 https://security.debian.org/debian-security bookworm-security InRelease [48.0 kB]
Hit:2 https://deb.debian.org/debian bookworm InRelease
Get:3 https://deb.debian.org/debian bookworm-updates InRelease [55.4 kB]
Get:4 https://security.debian.org/debian-security bookworm-security/main Sources [150 kB]
Get:5 https://security.debian.org/debian-security bookworm-security/main amd64 Packages [277 kB]
Get:6 https://security.debian.org/debian-security bookworm-security/main Translation-en [167 kB]
Fetched 697 kB in 1s (601 kB/s)
Reading package lists... Done
Building dependency tree... Done
Reading state information... Done
44 packages can be upgraded. Run 'apt list --upgradable' to see them.
root@ns100:~#
Install paket Web server
root@ns100:~# apt install apache2
Reading package lists... Done
Building dependency tree... Done
Reading state information... Done
The following additional packages will be installed:
  apache2-bin apache2-data apache2-utils libapr1 libaprutil1 libaprutil1-dbd-sqlite3 libaprutil1-ldap libcurl4 liblua5.3-0
Suggested packages:
  apache2-doc apache2-suexec-pristine | apache2-suexec-custom www-browser
The following NEW packages will be installed:
  apache2 apache2-bin apache2-data apache2-utils libapr1 libaprutil1 libaprutil1-dbd-sqlite3 libaprutil1-ldap libcurl4 liblua5.3-0
0 upgraded, 10 newly installed, 0 to remove and 44 not upgraded.
Need to get 2,709 kB of archives.
After this operation, 9,160 kB of additional disk space will be used.
Do you want to continue? [Y/n] y
Get:1 https://deb.debian.org/debian bookworm/main amd64 libapr1 amd64 1.7.2-3+deb12u1 [102 kB]
Get:2 https://deb.debian.org/debian bookworm/main amd64 libaprutil1 amd64 1.6.3-1 [87.8 kB]
Get:3 https://deb.debian.org/debian bookworm/main amd64 libaprutil1-dbd-sqlite3 amd64 1.6.3-1 [13.6 kB]
Get:4 https://deb.debian.org/debian bookworm/main amd64 libaprutil1-ldap amd64 1.6.3-1 [11.8 kB]
Enabling conf other-vhosts-access-log.
Enabling conf security.
Enabling conf serve-cgi-bin.
Enabling site 000-default.
Created symlink /etc/systemd/system/multi-user.target.wants/apache2.service → /lib/systemd/system/apache2.service.
Created symlink /etc/systemd/system/multi-user.target.wants/apache-htcacheclean.service → /lib/systemd/system/apache-htcacheclean.service.
Processing triggers for libc-bin (2.36-9+deb12u10) ...
Langkah 2 – Konfigurasi HTTP (Virtualhost)
File konfigurasi utama apache terletak di /etc/apache2/sites-available/
- 000-default.conf –> untuk konfigurasi HTTP
- default-ssl.conf –> untuk konfigurasi HTTPS
root@ns100:~# cd /etc/apache2/sites-available/

root@ns100:/etc/apache2/sites-available# ls
000-default.conf  default-ssl.conf

root@ns100:/etc/apache2/sites-available# cp 000-default.conf sekolah100.conf

root@ns100:/etc/apache2/sites-available# ls
000-default.conf  default-ssl.conf  sekolah100.conf
Buka file sekolah100.conf dengan editor teks nano
root@ns100:/etc/apache2/sites-available# nano sekolah100.conf
Tambahkan dan sesuaikan script berikut ini:
<VirtualHost *:80>
        # The ServerName directive sets the request scheme, hostname and port that
        # the server uses to identify itself. This is used when creating
        # redirection URLs. In the context of virtual hosts, the ServerName
        # specifies what hostname must appear in the request's Host: header to
        # match this virtual host. For the default virtual host (this file) this
        # value is not decisive as it is used as a last resort host regardless.
        # However, you must set it for any further virtual host explicitly.
        #ServerName www.example.com

        ServerName sekolah100.sch.id
        ServerAlias www.sekolah100.sch.id
        ServerAdmin haryadi@sekolah100.sch.id
        DocumentRoot /var/www/html

        # Available loglevels: trace8, ..., trace1, debug, info, notice, warn,
        # error, crit, alert, emerg.
        # It is also possible to configure the loglevel for particular
        # modules, e.g.
        #LogLevel info ssl:warn

        ErrorLog ${APACHE_LOG_DIR}/error.log
        CustomLog ${APACHE_LOG_DIR}/access.log combined

        # For most configuration files from conf-available/, which are
        # enabled or disabled at a global level, it is possible to
        # include a line for only one particular virtual host. For example the
        # following line enables the CGI configuration for this host only
        # after it has been globally disabled with "a2disconf".
        #Include conf-available/serve-cgi-bin.conf
</VirtualHost>
Simpan perubahan dan keluar dari editor nano
Pindah ke root dokumen apache yaitu ke direktori /var/www/html
root@ns100:/etc/apache2/sites-available# cd /var/www/html/

root@ns100:/var/www/html# ls
index.html

root@ns100:/var/www/html# cp index.html index.html.asli

root@ns100:/var/www/html# nano index.html
Membuat folder share, read dan private serta mengubah permision-nya
<html>
  <head>
    <title>sekolah100.sch.id halaman Default</title>
  </head>
  <body>
        <p><h1>HTTP</h1></p>
        <p><h2>http://192.168.100.1</h2></p>
        <p><h2>http://sekolah100.sch.id</h2></p>
  </body>
</html>
Disable default virtualhost
root@ns100:/var/www/html# a2dissite 000-default.conf
Site 000-default disabled.
To activate the new configuration, you need to run:
  systemctl reload apache2
Enable sekolah100.conf virtualhost
root@ns100:/var/www/html# a2ensite sekolah100.conf
Enabling site sekolah100.
To activate the new configuration, you need to run:
  systemctl reload apache2
Restart layanan apache
root@ns100:/var/www/html# /etc/init.d/apache2 restart
Restarting apache2 (via systemctl): apache2.service.
Langkah 3 – Pengujian
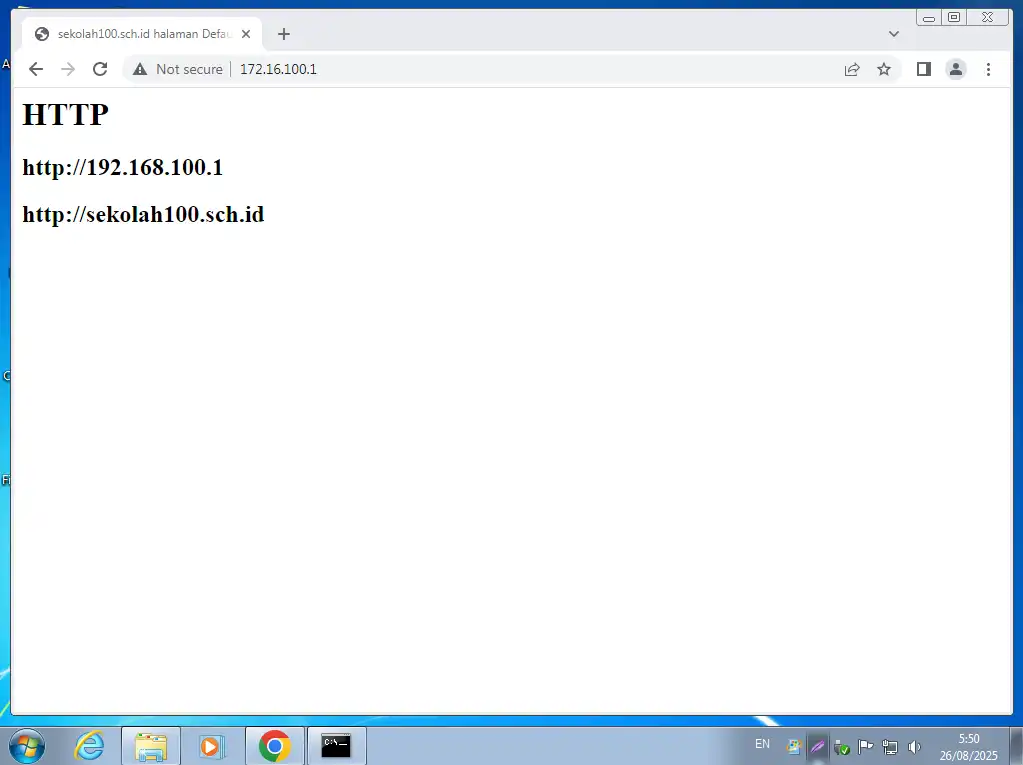
Pengujian Web server protokol HTTP
Buka browser dan bersihkan cache-nya terlebih dahulu dengan menekan tombol kombnasi Ctrl+F5. Buka url dengan mengetikkan IP Address: http://172.16.100.1
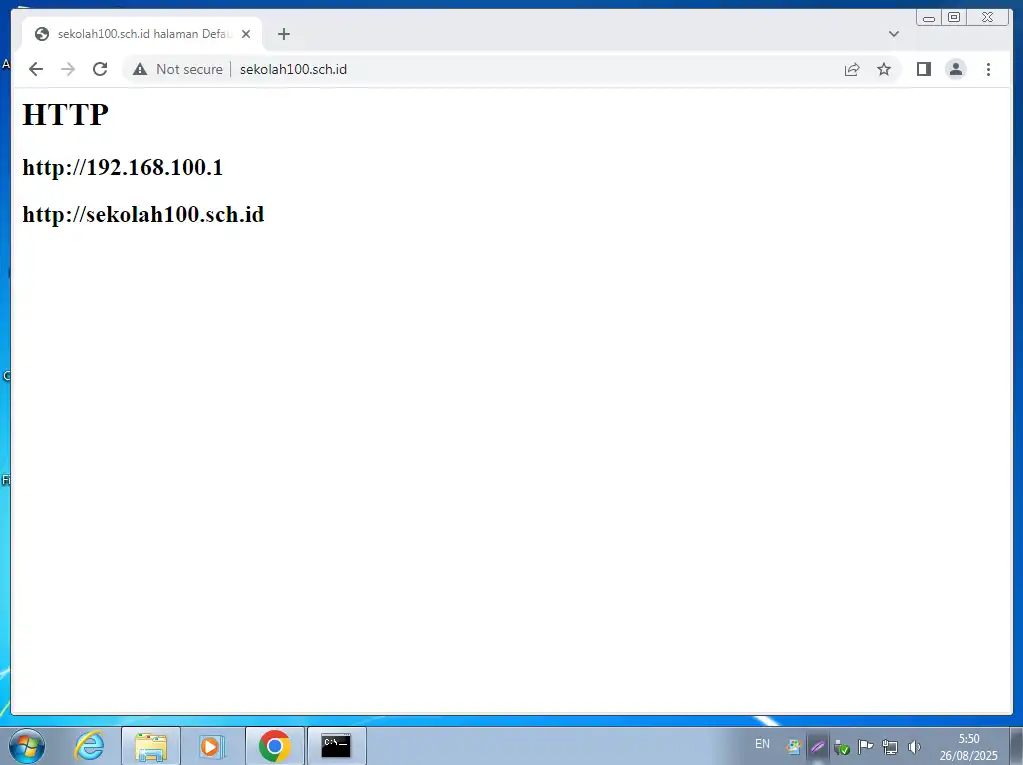
Buka url dengan mengetikkan alamat domain: http://sekolah100.sch.id
Langkah 4 – Konfigurasi HTTPS
Pindah ke direktori private, lalu generete key
root@ns100:/var/www/html# cd /etc/ssl/private/

root@ns100:/etc/ssl/private# openssl genrsa -aes128 -out sekolah100.key 2048
Enter PEM pass phrase: root123
Verifying - Enter PEM pass phrase: root123

root@ns100:/etc/ssl/private# ls
sekolah100.key  ssl-cert-snakeoil.key  vsftpd.pem

root@ns100:/etc/ssl/private# openssl rsa -in sekolah100.key -out sekolah100.key
Enter pass phrase for sekolah100.key: root123
writing RSA key
root@ns100:/etc/ssl/private# openssl req -new -days 365 -key sekolah100.key -out sekolah100.csr
Ignoring -days without -x509; not generating a certificate
You are about to be asked to enter information that will be incorporated
into your certificate request.
What you are about to enter is what is called a Distinguished Name or a DN.
There are quite a few fields but you can leave some blank
For some fields there will be a default value,
If you enter '.', the field will be left blank.
-----
Country Name (2 letter code) [AU]:ID
State or Province Name (full name) [Some-State]:JAWA TENGAH
Locality Name (eg, city) []:KLATEN
Organization Name (eg, company) [Internet Widgits Pty Ltd]:SMKN 1 KLATEN
Organizational Unit Name (eg, section) []:TJKT
Common Name (e.g. server FQDN or YOUR name) []:sekolah100.sch.id
Email Address []:hyd@sekolah100.sch.id

Please enter the following 'extra' attributes
to be sent with your certificate request
A challenge password []: Tekan Enter
An optional company name []: Tekan Enter
root@ns100:/etc/ssl/private# openssl x509 -in sekolah100.csr -out sekolah100.crt -req -signkey sekolah100.key -days 365
Certificate request self-signature ok
subject=C = ID, ST = JAWA TENGAH, L = KLATEN, O = SMKN 1 KLATEN, OU = TJKT, CN = sekolah100.sch.id, emailAddress = hyd@sekolah100.sch.id
root@ns100:/etc/ssl/private# chmod 400 sekolah100.*

root@ns100:/etc/ssl/private# cd /etc/apache2/sites-available/

root@ns100:/etc/apache2/sites-available# ls
000-default.conf  default-ssl.conf  sekolah100.conf

root@ns100:/etc/apache2/sites-available# cp default-ssl.conf sekolah100-ssl.conf
root@ns100:/etc/apache2/sites-available# nano sekolah100-ssl.conf
<VirtualHost *:443>

ServerAdmin hyd@sekolah100.sch.id
ServerName sekolah100.sch.id
ServerAlias www.sekolah100.sch.id

DocumentRoot /var/www/html/https

# Available loglevels: trace8, ..., trace1, debug, info, notice, warn,
# error, crit, alert, emerg.
# It is also possible to configure the loglevel for particular
# modules, e.g.
#LogLevel info ssl:warn

ErrorLog ${APACHE_LOG_DIR}/error.log
CustomLog ${APACHE_LOG_DIR}/access.log combined

# For most configuration files from conf-available/, which are
# enabled or disabled at a global level, it is possible to
# include a line for only one particular virtual host. For example the
# following line enables the CGI configuration for this host only
# after it has been globally disabled with "a2disconf".
#Include conf-available/serve-cgi-bin.conf

# SSL Engine Switch:
# Enable/Disable SSL for this virtual host.
SSLEngine on

# A self-signed (snakeoil) certificate can be created by installing
# the ssl-cert package. See
# /usr/share/doc/apache2/README.Debian.gz for more info.
# If both key and certificate are stored in the same file, only the
# SSLCertificateFile directive is needed.
#SSLCertificateFile /etc/ssl/certs/ssl-cert-snakeoil.pem
#SSLCertificateKeyFile /etc/ssl/private/ssl-cert-snakeoil.key
SSLCertificateFile /etc/ssl/private/sekolah100.crt
SSLCertificateKeyFile /etc/ssl/private/sekolah100.key

# Server Certificate Chain:
# Point SSLCertificateChainFile at a file containing the
# concatenation of PEM encoded CA certificates which form the
# certificate chain for the server certificate. Alternatively
# the referenced file can be the same as SSLCertificateFile
# when the CA certificates are directly appended to the server
# certificate for convinience.
#SSLCertificateChainFile /etc/apache2/ssl.crt/server-ca.crt

# Certificate Authority (CA):
# Set the CA certificate verification path where to find CA
# certificates for client authentication or alternatively one
# huge file containing all of them (file must be PEM encoded)
# Note: Inside SSLCACertificatePath you need hash symlinks
# to point to the certificate files. Use the provided
# Makefile to update the hash symlinks after changes.
#SSLCACertificatePath /etc/ssl/certs/
#SSLCACertificateFile /etc/apache2/ssl.crt/ca-bundle.crt

# Certificate Revocation Lists (CRL):
# Set the CA revocation path where to find CA CRLs for client
# authentication or alternatively one huge file containing all
# of them (file must be PEM encoded)
# Note: Inside SSLCARevocationPath you need hash symlinks
# to point to the certificate files. Use the provided
# Makefile to update the hash symlinks after changes.
#SSLCARevocationPath /etc/apache2/ssl.crl/
#SSLCARevocationFile /etc/apache2/ssl.crl/ca-bundle.crl

# Client Authentication (Type):
# Client certificate verification type and depth. Types are
# none, optional, require and optional_no_ca. Depth is a
# number which specifies how deeply to verify the certificate
# issuer chain before deciding the certificate is not valid.
#SSLVerifyClient require
#SSLVerifyDepth 10

# SSL Engine Options:
# Set various options for the SSL engine.
# o FakeBasicAuth:
# Translate the client X.509 into a Basic Authorisation. This means that
# the standard Auth/DBMAuth methods can be used for access control. The
# user name is the `one line' version of the client's X.509 certificate.
# Note that no password is obtained from the user. Every entry in the user
# file needs this password: `xxj31ZMTZzkVA'.
# o ExportCertData:
# This exports two additional environment variables: SSL_CLIENT_CERT and
# SSL_SERVER_CERT. These contain the PEM-encoded certificates of the
# server (always existing) and the client (only existing when client
# authentication is used). This can be used to import the certificates
# into CGI scripts.
# o StdEnvVars:
# This exports the standard SSL/TLS related `SSL_*' environment variables.
# Per default this exportation is switched off for performance reasons,
# because the extraction step is an expensive operation and is usually
# useless for serving static content. So one usually enables the
# exportation for CGI and SSI requests only.
# o OptRenegotiate:
# This enables optimized SSL connection renegotiation handling when SSL
# directives are used in per-directory context.
#SSLOptions +FakeBasicAuth +ExportCertData +StrictRequire
<FilesMatch "\.(?:cgi|shtml|phtml|php)$">
         SSLOptions +StdEnvVars
</FilesMatch>
<Directory /usr/lib/cgi-bin>
         SSLOptions +StdEnvVars
</Directory>

# SSL Protocol Adjustments:
# The safe and default but still SSL/TLS standard compliant shutdown
# approach is that mod_ssl sends the close notify alert but doesn't wait for
# the close notify alert from client. When you need a different shutdown
# approach you can use one of the following variables:
# o ssl-unclean-shutdown:
# This forces an unclean shutdown when the connection is closed, i.e. no
# SSL close notify alert is send or allowed to received. This violates
# the SSL/TLS standard but is needed for some brain-dead browsers. Use
# this when you receive I/O errors because of the standard approach where
# mod_ssl sends the close notify alert.
# o ssl-accurate-shutdown:
# This forces an accurate shutdown when the connection is closed, i.e. a
# SSL close notify alert is send and mod_ssl waits for the close notify
# alert of the client. This is 100% SSL/TLS standard compliant, but in
# practice often causes hanging connections with brain-dead browsers. Use
# this only for browsers where you know that their SSL implementation
# works correctly.
# Notice: Most problems of broken clients are also related to the HTTP
# keep-alive facility, so you usually additionally want to disable
# keep-alive for those clients, too. Use variable "nokeepalive" for this.
# Similarly, one has to force some clients to use HTTP/1.0 to workaround
# their broken HTTP/1.1 implementation. Use variables "downgrade-1.0" and
# "force-response-1.0" for this.
# BrowserMatch "MSIE [2-6]" \
# nokeepalive ssl-unclean-shutdown \
# downgrade-1.0 force-response-1.0

</VirtualHost>
root@ns100:/etc/apache2/sites-available# mkdir /var/www/html/https
root@ns100:/etc/apache2/sites-available# nano /var/www/html/https/index.html
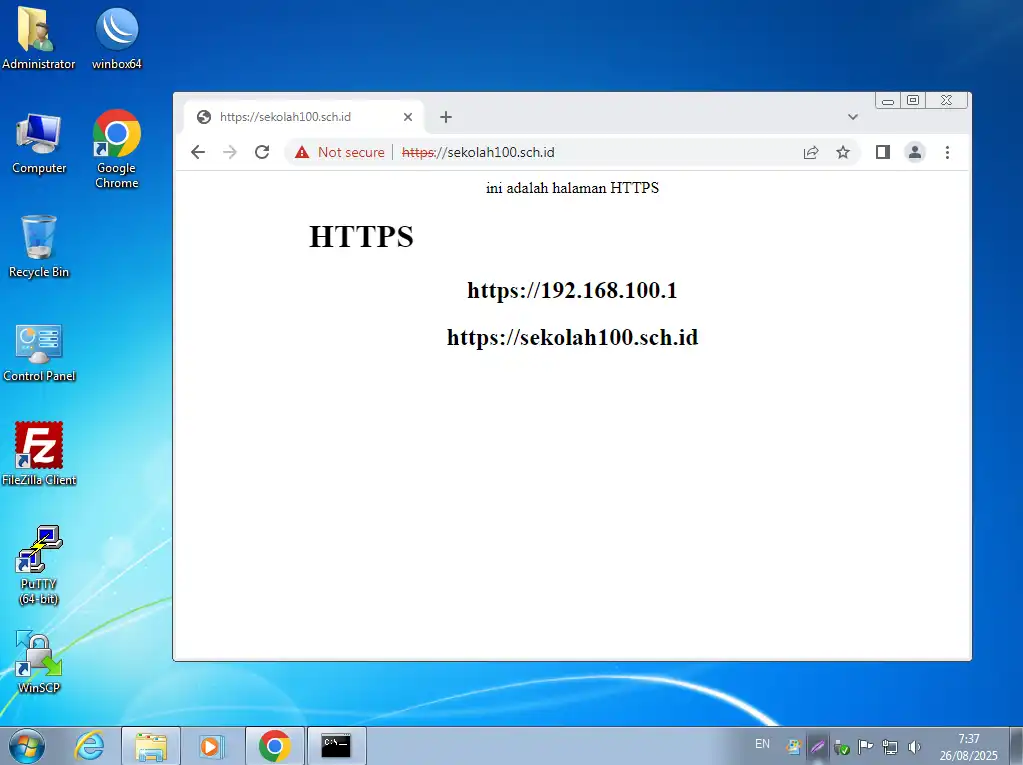
<div align="center">
<p>ini adalah halaman HTTPS</p>
<p><h1><marquee>HTTPS</marquee></h1></p>
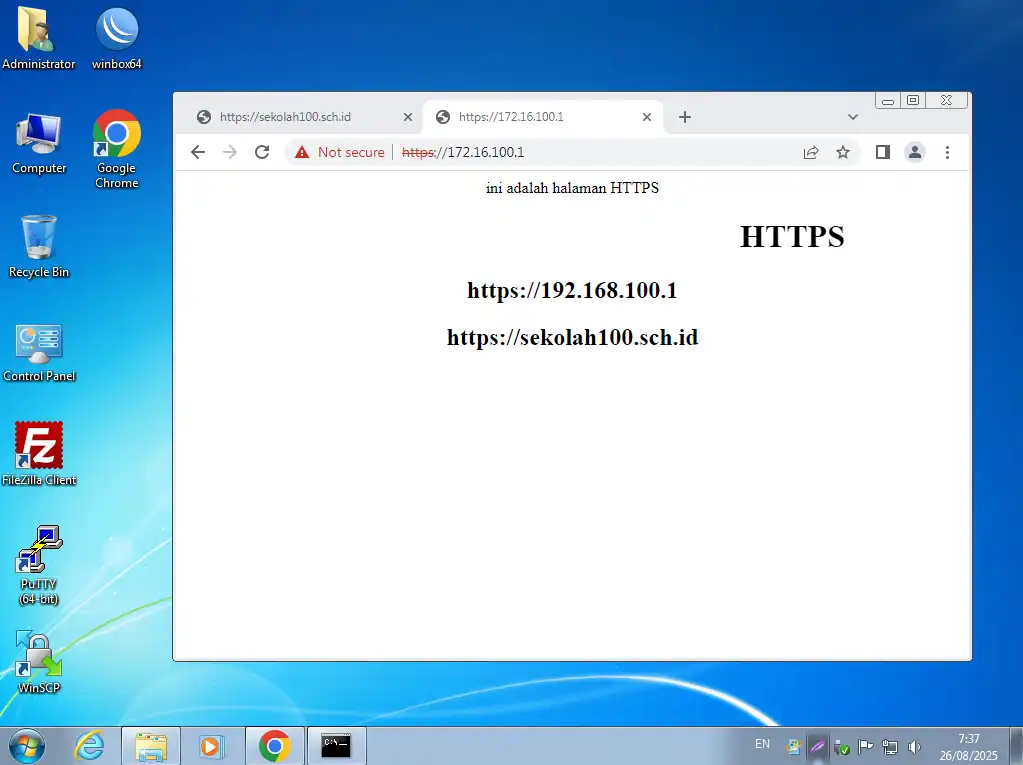
<p><h2>https://192.168.100.1</h2></p>
<p><h2>https://sekolah100.sch.id</h2></p>
</div>
root@ns100:/etc/apache2/sites-available# a2enmod ssl
Considering dependency setenvif for ssl:
Module setenvif already enabled
Considering dependency mime for ssl:
Module mime already enabled
Considering dependency socache_shmcb for ssl:
Enabling module socache_shmcb.
Enabling module ssl.
See /usr/share/doc/apache2/README.Debian.gz on how to configure SSL and create self-signed certificates.
To activate the new configuration, you need to run:
  systemctl restart apache2

root@ns100:/etc/apache2/sites-available# a2ensite sekolah100-ssl.conf
Enabling site sekolah100-ssl.
To activate the new configuration, you need to run:
  systemctl reload apache2

root@ns100:/etc/apache2/sites-available# /etc/init.d/apache2 restart
Restarting apache2 (via systemctl): apache2.service.
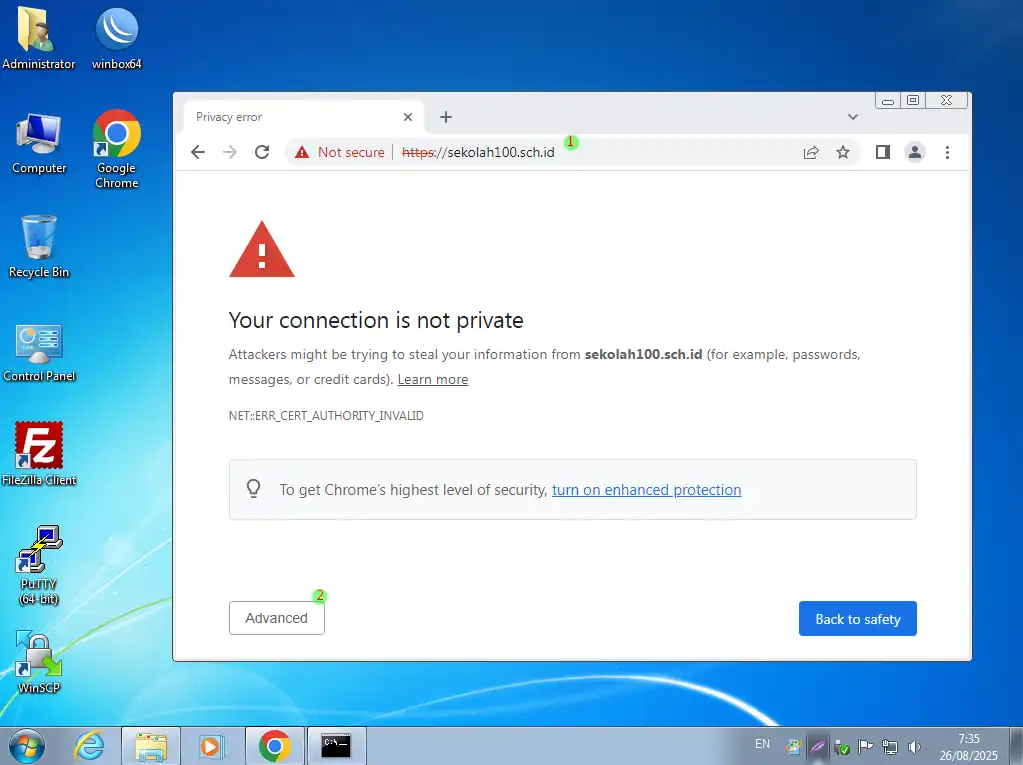
Pengujian Web Server (HTTPS)
- Ketik url https://sekolah100.sch.id
- Klik tombol Advanced
Klik Proceed ….
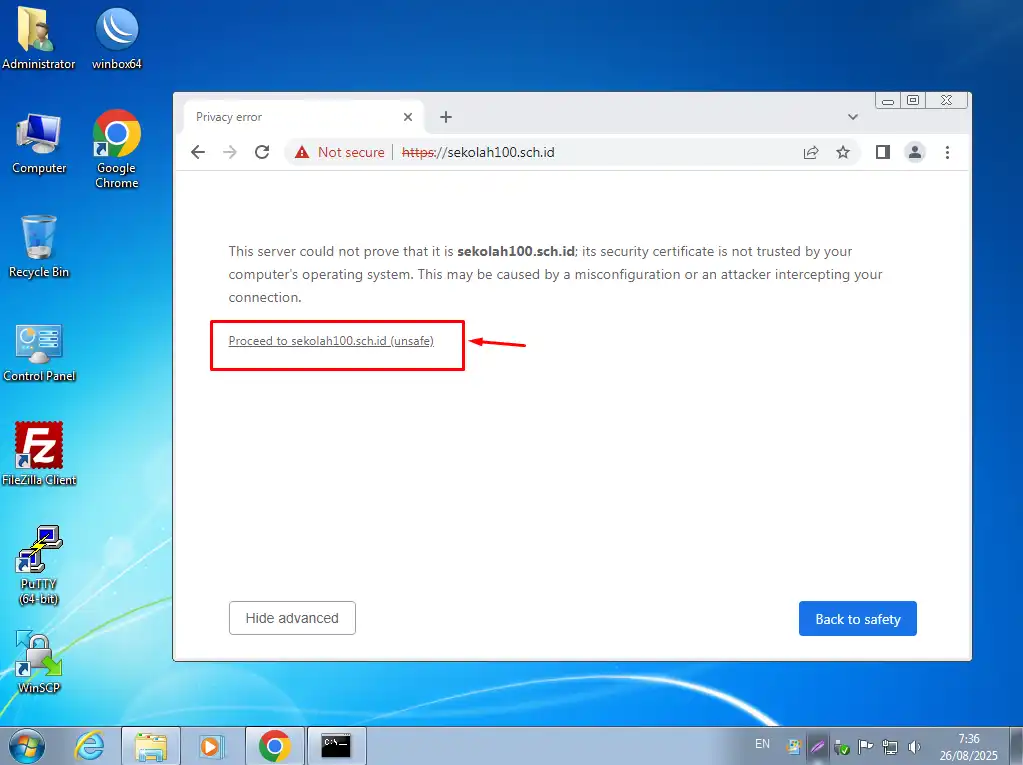
Akses https menggunakan nama domain berhasil
Akses menggunakan alamat IP Address


”")
”")